by,
Byron Reynolds
Byron@RaceSystems.COM
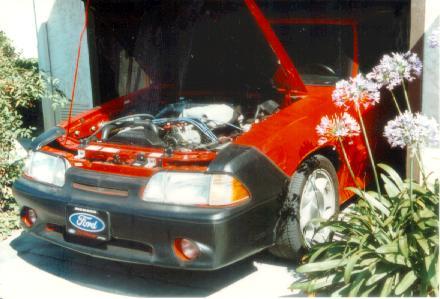
1993 Vibrant Red Supercharged SVT Cobra #1681
Project: 130A 3G Alternator Upgrade
by,
Byron Reynolds
Byron@RaceSystems.COM
1993 Vibrant Red Supercharged SVT Cobra #1681
This information is for entertainment purposes only. The author provides this information free of charge and without warranty or support. The author believes the instructions contained herein to be correct. He has performed this procedure on his own vehicle with success and has road-tested the solution for 1200 miles before releasing this information.
Why bother to upgrade?
If you don't currently have a problem, this upgrade offers you nothing. However, I've been
exposed to dozens of stock Mustangs and nearly all of them have charging problems at idle.
You may want to read this project , run some tests, and decide for yourself.
Stock Inadequacies:
Connect a volt meter to the terminals of the battery in your stock 86-93 Mustang. Run the
car at idle, and watch the voltage dip below normal battery voltage level (as low as 10 or
11V) when the lights and heater are on. It should soon become clear why Police Special
Service Mustangs were equipped with more powerful alternators. If a stock Mustang is left
at idle with the headlights and heater on, the battery will be dead within a few hours.
Underdrive Pulleys:
This popular add on has an unfortunate side effect, it amplifies the electrical problems
stated above. Underdrive pulleys reduce the speed at which the alternator spins. If you're
running underdrive pulleys, have a stock 75A alternator, and are idling at factory 650 -
750RPM idle, your battery is probably being discharged. Add lights, heater fan, rear
defroster, and a big stereo to this scenario, and your battery is definitely in trouble.
To fix this problem, people commonly bump up the idle speed to around 1000 RPM or more.
This brings the alternator back up to stock speed, but ruins stock idle, wastes fuel, and
causes problems in some states with tight emissions control requirements.
Problematic Spade Connector:
The factory alternator uses a 3-prong spade connector. Two of the spades share the current
coming from the alternator. These terminals often wear/corrode and cause a resistive
electrical path for the current to flow. The resistance causes heat; enough to melt the
connector, create a short circuit, or start a fire. If you've ever replaced the factory
alternator, you probably noticed that it came with a fresh connector and big warning
labels describing the dangers of not replacing the old connector with the fresh one. This
problem is well known, and the cause of numerous alternator failures, engine fires, etc.
The 3G 130A alternator does away with this problematic connector.
Stronger Is Better:
Running a 3G 130A alternator at 30% capacity is much better than running a 75A alternator
at 60% capacity. A 3G alternator will last a long time when put on "light duty"
use in a Mustang. This alternator is made to run winches, light bars, spotlights, etc. It
has a tough diode pack and voltage regulator, improved bearings, etc. It's twice the
alternator at only 25% additional cost.
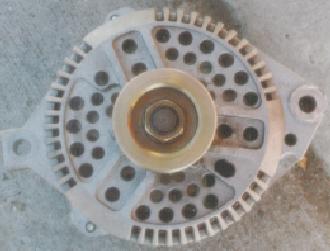
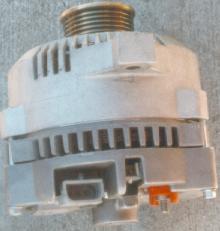
The 3G unit looks good:
Internal cooling fan, modern design, clean and mean.
Get to know the 3G Alternator:
A picture of this new alternator can be seen below. Note the differences between it and
your factory 75A unit.
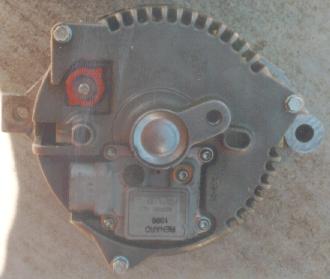
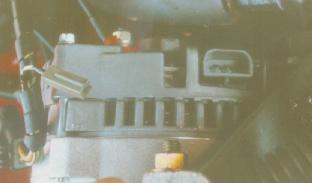
Electrical Differences:
The 3G model alternator feeds power through a high-power electrical terminal instead of
the problematic spade connectors in the 75A model. The stator signal wire is located on a
separate connector on the 3G model. Because of these differences, the stock wiring harness
will need modification before the 3G alternator can be put to use.
Mechanical Differences:
The mounting holes on the 3G are in the exact same location as the 75A model. However, on
some models, the top mounting hole is not threaded. It is necessary to use a nut, bolt,
and two washers at the top mounting location.
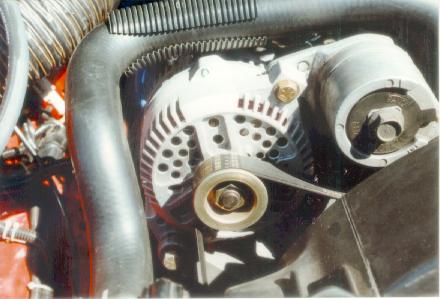
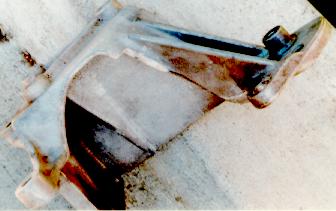
There can also be a slight clearance problem requiring modification of the alternator bracket. It may be necessary to trim a triangular section of the bracket in order to make room for the larger 3G alternator. The modification is minor, easy to accomplish, and does not adversely affect the strength of the bracket. I have heard reports from several people that have done this install who state that clearancing was not required due to variations in bracket designs.
![]()
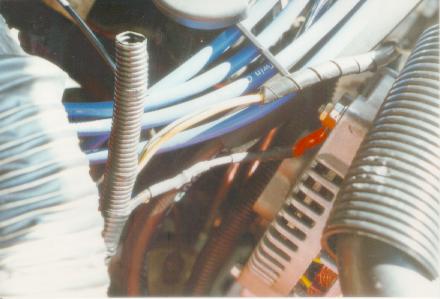
Also, be forewarned, if you have a Powerdyne BD-1x supercharger kit on your Mustang, you
will need to fabricate a small extension bar to pivot the alternator further away from the
smog pump or it will contact the smog pump housing and destroy it (learned this the hard
way). Also, you'll need to get a slightly larger serpentine belt to make things fit. A
910K6 belt works well. Reports in from the Vortech crowd say that there are no clearance
problems with that kit, but this has not been verified.
The pulley is larger. The alternator that this author purchased came with a pulley
slightly larger than the one found on the 75A model. It's about the same size as the
pulley that came with an AutoSpecialties underdrive pulley kit that was already installed
on this vehicle, so there was no need to change it. If this pulley is retained on a
vehicle with stock pulleys, the stock serpentine belt should still fit, but it may be a
bit tight. The pulley can be changed if the smaller stock pulley is desired.
Shopping List:
Parts:
(1) 130A 3G alternator. Mine was purchased from Pep Boys for ($219.99)
It was specified as standard equipment for a '94 5.0L Mustang GT.
(1) 2" Grade 8 3/8" coarse thread Bolt (29 cents)
(1) Grade 8 Nut for above (10 cents)
(2) Washers for above (20 cents)
(1) 10" length of 10 or 8 gauge stranded-core electrical wire. (20 cents)
(1) FORD 3G Alternator stator wire connector (Junk yard, fabricate, etc.).
(1) Electrical screw lug connector (10ga) (10 cents)
(1) 12" length of 1/2" diameter wire loom. ($2)
(1) 2" section of 8 gauge heat shrink tubing (10 cents)
(1) 2" section of 14 gauge heat shrink tubing (10 cents)
Tools:
Socket set, Wrenches, Electrical pliers, Soldering Iron, Solder, Voltmeter (for testing).
Dremel, Die Grinder, or equiv. (if bracket clearancing is needed.)
Procedure:
Assuming moderate mechanical and electrical experience, this entire procedure should take
less than 2 hours to perform. The author completed the install the first time in about 2
hours and the second time in approximately 45 minutes.
Prep the car:
1. Start by DISCONNECTING THE BATTERY and removing the serpentine belt.
2. Unplug the factory alternator connectors from the alternator.
3. Unbolt and remove the factory alternator (2 bolts).
4. Tie top radiator hose out of the way.
5. Remove air filter housing and filter to give more room to work. (optional /
recommended)
6. Peel back / unravel plastic covering on factory wiring harness.
Mechanical:
1. Test fit the 3G alternator, slide in the bottom mounting bolt, and rotate into
position. If you have a supercharger kit installed, these instructions will not make sense
but may be of some use.
2. Mark the factory alternator bracket needing clearance (if necessary).
3. Clearance the alternator bracket by cutting/grinding away the marked area with a die
cutter or dremel. The author used a dremel and a small cutting bit. This part took about
10 minutes to complete.
4. Secure alternator using original bottom bolt and new 2" top nut, bolt, and
washers.
Electrical:
1. Locate the point where the pair of MAIN wires (black/orange) join and become one.
2. Cut at intersection., leaving one MAIN wire.
3. Splice in new piece of 10 Gauge wire, solder, and use heat shrink tubing to insulate.
4. Test fit wire to alternator MAIN lug, trim as needed for good fit.
5. Crimp and solder on screw-terminal, use heat shrink tubing to insulate as needed.
6. Install screw lug on MAIN screw terminal. Once tight, slightly bend screw lug away from
alternator housing.
7. Cut stator wire 2" from factory oval plug. This cut frees the factory 3-prong
spade connector which can be discarded.
8. Splice in new stator connector, solder, use heat shrink to insulate.
9. Apply wire loom, plug in connectors, tie wrap as needed.
Finishing Up:
1. Re-install air filter and housing.
2. Reconnect battery and immediately check voltage across terminals. It should read above
12V. If not, disconnect battery and check installation.
3. Untie radiator hose.
Testing:
1. Connect voltmeter across battery terminals.
2. With key off, voltage should read 12-12.6 volts. My car was at 12.4V.
3. Turn off all accessories and turn key on. Instrumentation battery light should be on
(dash). And voltage should drop to between 11 and 12V.***if voltage drops below 10V,
remove key immediately and re-check installation.
4. Start car. Voltage should jump to above 13 Volts. Our car was at 14.2V. Battery light
should turn off.***if this does not happen, shut off car immediately and re-check
installation.
5. Bring engine to 2,000 RPM With all accessories off, Voltage should be above 14V. Ours
was at 14.4V.
6. Return to idle. Voltage should still be above 13V. Mine was at 14.2V.
7. Turn on headlights. Voltage should still be above 12.5V. Mine was at 14.2V.
8. Turn heater fan on high. Voltage should still be above 12.5V. Mine was at 14.1V.
9. Turn on road lights. Voltage should still be above 12.5V Mine was at 14.0V.
10. Bring engine to 1,000 RPM. Voltage should be above 13V. Mine was at 14.5V.
11. Shut off car.
Congratulations, you have greatly improved your electrical system and can look forward to
longer battery life, improved charging at idle, and plenty of power for even the most
demanding electrical accessories. The authors vehicle can run the headlights, fog lights,
heater fan, rear defroster, window wipers, brake lights, and a 250W 10 speaker stereo
system...with the car at idle... without causing the improved electrical system to dip
below 12.7V. Even with all these accessories on, the battery is still being charged!
Caution & Update:
07/02/97
Last night on the way home, I hit a pot-hole in the road and noticed my headlights
flicker. When I got home, I promptly inspected my electricals and discovered an apparent
manufacturing flaw in the particular 3G I got from Pep Boys.
I exchanged it for a new one, and made corrections to the new alternator to insure this
didn't happen again.
The problem:
The windings of the 3g connect to the rectifier and pass by a metal "ridge"
inside the alternator. The company that remanufactured these alternators apparently
thought it was "a good idea" to use a fiberglass boot to insulate these coated
wires from the body of the alternator and assemble the alternator in such a way that some
of the wires are pressed against the alternator body, insulated only by this fiberglass
boot.
Well, in 3mos of use, one of the fiberglass boots wore through on a sharp spot and a
winding shorted to the body of the alternator. That's what caused the headlights to
flicker when I hit the hole in the road.
The problem (if it exists on your 3G) can be easily avoided by simply bending the wires
away from the body of the alternator. This can be done without disassembly by using the
large vent holes near the back of the alternator to gain access to the windings.
The new 3G (thank god for the lifetime exchange warranty) had the same potential problem.
I bent the wiring and now have plenty of clearance between the windings and alternator
body.
If you have a 3G, it may be worth your time to check for this problem.
I doubt this problem exists with factory-fresh 3G's. It's probably just one of the
lesser-known features of a remanufactured alternator. I don't think it's something that is
likely to happen again, but of course it had to happen to me...my car is posessed.